Saturday, 19 April 2014

10 Homemade Easter Treat Ideas

Hi Folks,

I’m not a massive fan of Easter crafts- we don't decorate the house for Easter or have any children, however like most people with a tongue, I adore chocolate. I am, all in all, a complete sugar addict- I love sweets of all kinds so Easter is one of my favourite holidays (that and long weekend we get off of work).  
This year I inadvertently left it way too late to get my partner an Easter Egg, so decided to make him his favourite chocolate orange fudge-the recipe of which can be found here.
As I was making the fudge this afternoon I started thinking that perhaps it could be a nice tradition to make something homemade every year- there must be loads of great homemade easter sweets you can make that are much tastier and thoughtful than the generic off the shelf ones! Here’s the top ten I could find on my search for ideas:

10 Homemade Easter Sweets

One of my favourite Easter chocolates is Cadbury's Mini Eggs, and this bark is ridiculous cute, as well as simple to make.

Cadburys Creme Eggs are my all time favourite Easter chocolate- I'm intrigued by this homemade version!

Another combination of yummy things I'll have to try!


ARGH, So cute!

These may look tricky, but after reading the recipe I think any crafty person should have no trouble- and they look really impressive.

This is a really clever idea- but I’d use only half the cone myself, to make them a bitesize snack.

No, not the french macaron- the coconut macaroooooon! Makes the perfect little next for mini eggs!


Yep, you can make baskets out of cookies- so happy when I found this out!


A more mature homemade easter treat...


Lemon and meringue, a lovely non-chocolate alternative.


PS- A lot of these recipes include an ingredient called Candy Melts- just FYI you can buy this in the UK at a lot of cake decorating stores, and Hobbycraft carries it too (here's a link). 
Happy Easter!
Hayley xxx 

Tuesday, 18 March 2014

New Issue of Snippets!

Hi Folks, 
Just a quickie from me today. 
If you've not read it before- Snippets is the online magazine for my favourite ever craft website Cut Out + Keep.
I've been lucky enough to have written a few bits for them over the last year or two- the most recent one is an interview with Hong Kong based artists, Dekanimal
You can check out the interview here!
Ta Ta,
Hayley xx 

Sunday, 9 February 2014

Homemade Valentines Gifts (for the geek in your life)

Hi Folks,

I've been seeing a lot of “Homemade Valentines Ideas” on the craft blog-o-sphere recently and quite frankly I’m unimpressed… would your beau really want a lavender scented hanging heart? No. He would not. So this Valentines day, make the man in your life something he’d actually like to receive- Personally, my partner is a massive geek, so here’s my list of 5 cool homemade gifts that won't make him gag.  

1. 8-Bit Bow Tie


This one is super simple, you just need perler beads which you can get from any craft shop or online and a safety pin- here’s a tutorial.


2. Breaking Bad- Blue Meth Candy


Because you've got Chemistry- get it? Sugar Hero has a great tutorial. The ingredients are pretty basic, but you’ll need a candy thermometer to get it just right.  

3. Anatomically Correct Heart Cake


I got the recipe for these Eat Your Heart Out red velvet cakes from Lilli Vanilli’s “A Zombie Ate My Cupcake” recipe book- a copy can be found here. But I’d recommend buying the book from Amazon as it has a bunch of great, creepy recipes for any occasion.

4. Bacon Roses


Why not say I Love You with bacon?. Instructables has the best tutorial for this. ...I freaking love this idea.

5. Geeky Lingerie

This is a gift for him and you! Get yourself a plain bra and knickers set and customize to his favourite show, game, comic etc - you can customize using fabric paints, diamantes, it’s really up to you but here are some ideas:


You could even try customizing something for him…

Enjoy your Valentines Day readers,
Hayley x x x 

Saturday, 4 January 2014

New Year- New Shop!

Hello and Happy New Year to you gentle readers,
I've been super busy the last couple of months making Christmas presents for my loved ones (here's a few)


A eye mask and lavender sachet, a baby goth bib, a birdie brooch and some his and her microwave heating pads. I also did a load of chocolate orange fudge, my recipe can be found here
I also held my annual Christmas gathering with homemade mulled wine, nibbles, including these, secret santa, a quiz and other games, which was great fun if not exhausting!

Then it was New Year, and with a little spare time (in between making another nappy cake) I was able to reopen my shop, hurray!

Please let me formally reintroduce my Miss Fusspot's Fancies shop on Etsy!


If you're an Etsy lover, please do add me to your favourites and keep an eye out- there should be more items coming soon. 

Thanks,

Hayley xxx


Saturday, 16 November 2013

Planning your crafts for Christmas!

Is it okay to start feeling excited about Christmas ye!t? John Lewis says so. This delicious gingerbread latte suggests so...well whether or not it seems a little early to start putting up the tree and drinking nog, if your planning on making any gifts this year, it is at least time to start planning.
The big day is only 6 weeks away, and if you work full time or have a big family (both of which I do) then this could potentially mean only a few weekends worth of Christmas crafting! So I've started my Christmas prep in the usual way- a big ass spreadsheet. Here's how I manage to get it all done. 

Christmas Crafts Plan 
You will need either Microsoft excel, or a great free alternative I use is Google Docs spreadsheets.

Step 1. Name 5 columns (from left to right):
Column 1: Name
Column 2: Gift
Column 3: Instructions
Column 4: Duration
Column 5:  Date

Step 2. In Column 1, List everyone you want to make a gift for.

Step 3.  Do some research and decide what you will be making for people and then list what you decide in Column 2. Good online sources for gift ideas are Pinterest and Martha Stewart- there’s also some great books like Handmade Gifts.

Tip: Double up- make more than 1 of things that are edible or can be made in larger quantities easily- like soaps, bath bombs, and candy- you can give them out to more than one person, especially if the people receiving the same gift do not know each other.

Step 4. Find the instructions, patterns, recipes for all the items and put a link or reference to them in column 3.

Step 5. Once it’s all filled in, you've got your basic plan, now you need to work out how and when you have time to execute it. Lets start with the How- Create a mini table underneath with 3 sections- “To Buy”, “To Bake” and “To Make”. Going through all the instructions and recipes, deconstruct all the materials and ingredients you don’t have already and put them in these columns. When its all laid out like that, I think it looks much more acheivable. The first thing you’ll need to do is buy all the materials you need (except perishables like fresh ingredients- you’ll just have to pick that up on the day you bake).

Tip: Do this as soon as you can afford it, and as quickly as possible- having everything at home in advance is soooo helpful- I get most of my stuff off ebay.

Step 6. You’re then going to use the "To Make" and "To Bake" columns to help plan and fill in Column 5 the Date to make your items. Firstly, estimate how long you think each project will take e.g. 2 hours, 1 whole evening etc. And write this in column 4.

Tip: Overestimate so you don’t stress yourself out with unnecessarily tight deadlines, make time for a cup of tea or a break if it’s an all evening project.

Step 7: Look at your diary and find free weekends you can devote to the projects (or evenings if you have the energy- I usually don’t so have only planned for weekends).  If possible, plan and write down a date (or dates if it will take several sessions) you are going to make the gift. Though some projects like crochet or cross stitch are best done in front of the telly in the evening, so just start those ASAP. Also remember that if you are making Christmas cards- you should allocate an evening soon and make them ready to send on December 1st.

Tip: Remember to consider with edible gifts how long they are going to keep for- E.g. something like fudge will keep for a month if in airtight container, but you want your loved one to be able to keep it for at least a couple weeks before it goes stale- therefore you should try and find some time about 2 weeks before Christmas to make it. 

Step 8. You now have a completed plan for Christmas-celebrate! Woohoo! Yay! You are super organised. 

You can choose to use the filter function on your columns and sort the gifts by the date you plan to make them if you like- I find it helps. It could also be a good idea to make a note in your diary of what your making and when- so you don’t double book or forget. 
It may sound a little complicated, but once it’s all laid out, for me,  it makes things so much simpler to execute.I will not be sharing my actual Christmas plan- as my loved ones may see it and know what I’m making- but I've made a mock one for your reference gentle readers: Christmas Craft Plan Example.doc

Enjoy and Happy Crafting! 
Hayley xxx

Sunday, 27 October 2013

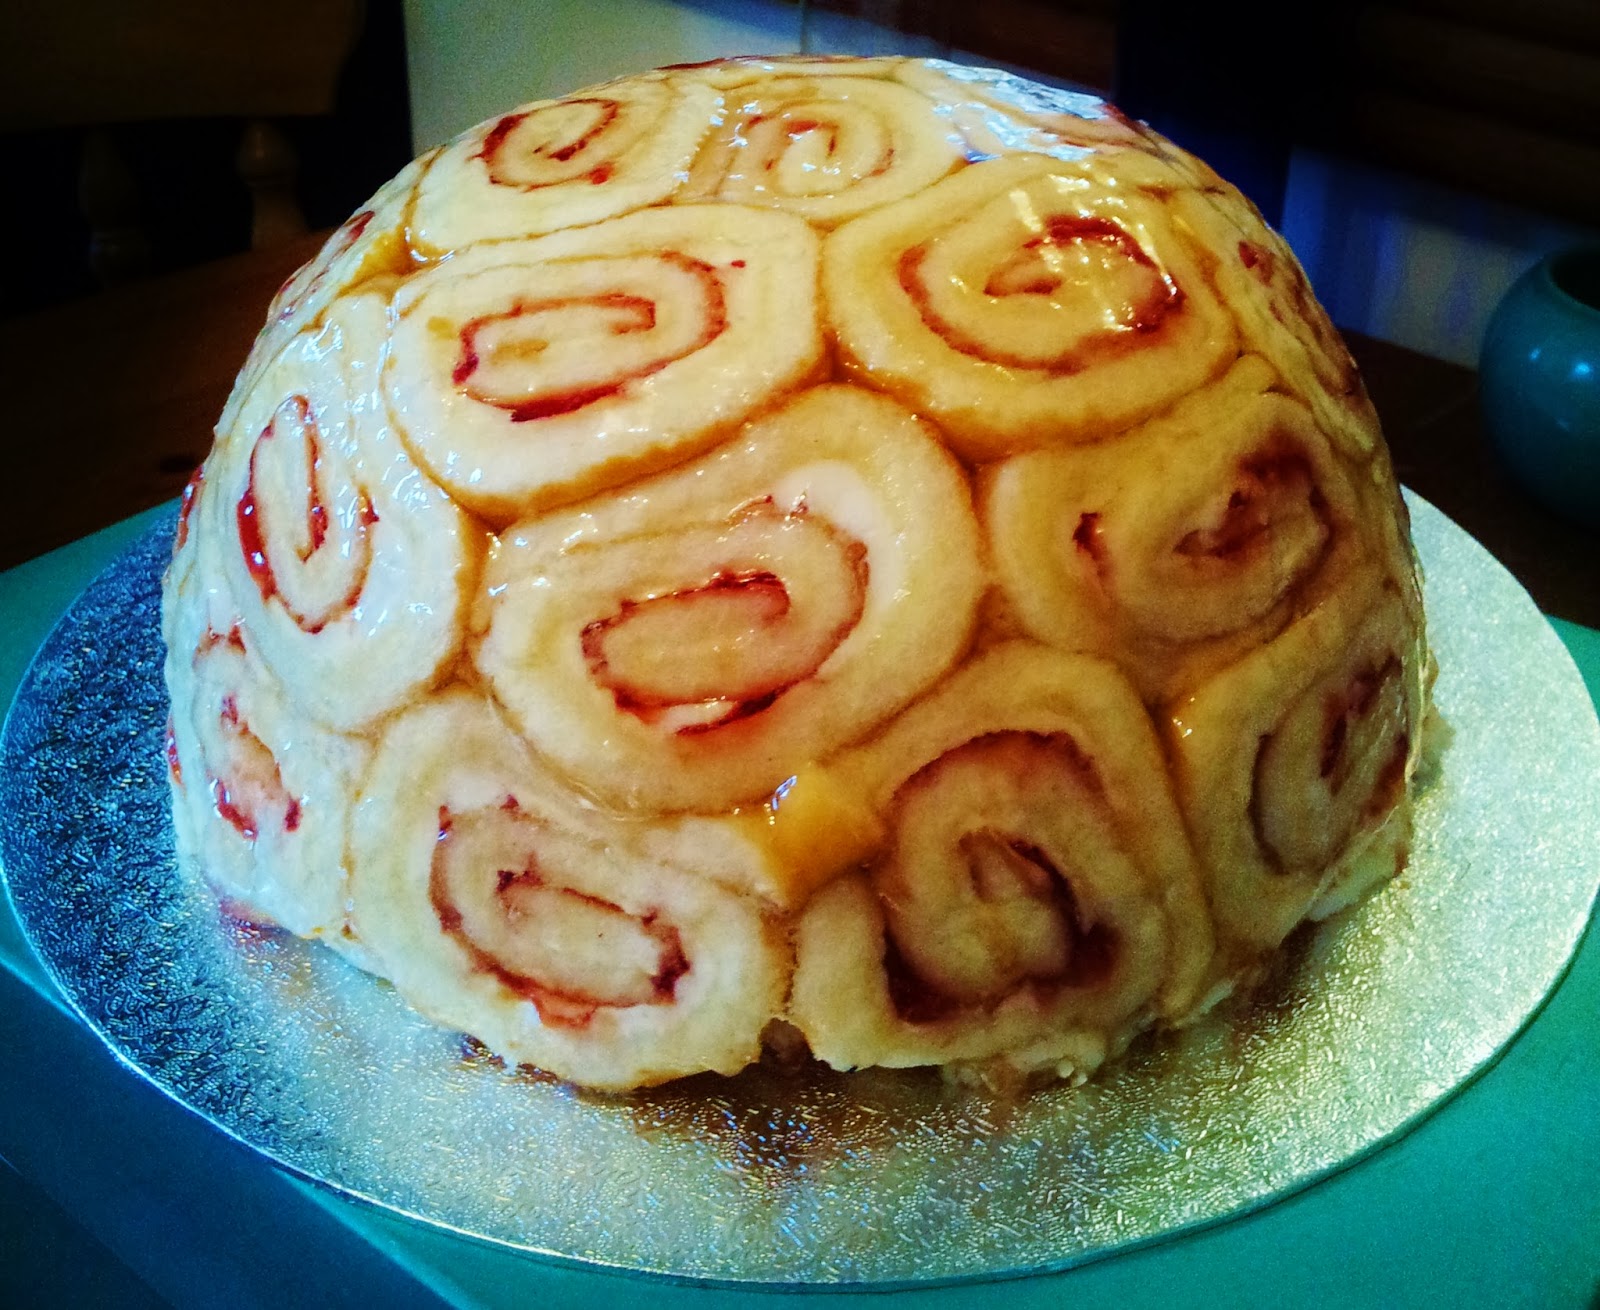
Charlotte Royal AKA "Brain cake" recipe!


I think like many Brits, I first discovered the existence of this amazingly creepy cake on The Great British Bake Off. Originally called a Charlotte Royal, the outer layer is made from slices of swiss roll, and the inside is a mix of jelly, custard and cream called a bavarois (or Bavarian cream). But I much prefer the name Brain Cake- mmmmm delicious brains...

What with Halloween being around the corner, I thought I’d give it a try- though for this recipe I would advise just buying the Swiss rolls rather than making them from scratch as they did on Bake Off- unless you fancy adding 2 hours to your bake for something that looks and tastes the same!

I’d also recommend making this in the evening so you can leave it to set overnight. The preparation, cake and the filling should only take about an hour and a half maximum and then in the morning, the decorative glaze on top takes about 15 minutes.


HAYLEY'S EASY BRAIN CAKE RECIPE

You will need:
  • 3 Jumbo strawberry or raspberry swiss roll
Filling
  • 20 g gelatin powder
  • 1 Pint whole milk
  • 2 Tbsp vanilla essence
  • 8 egg yolks- try not to include any egg white at all (if possible, it can be quite tricky!) as it will add little white blobs to your custard, and if there is a lot of egg white, it will make the custard taste eggy.
  • 100 g icing sugar and 50g icing sugar (separated)
  • 470 ml double cream cream (cold, straight from the fridge)
  • 227g (average sized punnet) of strawberries or raspberries- puree into a juice.
  • Red food dye (optional)
Gooey Glaze
  • 75g caster sugar
  • 125ml water
  • 1 tablespoon arrowroot
1. Cut the swiss roll into half inch slices and line a large glass bowl with cling film.

2 . Leaving no gaps use the slices of swiss roll to line the inside of the bowl. Start in the center and work outwards. Feel free to squeeze them in tightly- there shouldn't be any spaces for the filling to leak through. If needed, you can break off little bits of swiss roll and stuff them in the gaps. Make sure you leave some slices to one side to cover the top later (how many depends on the size of the bowl really)

3. If using gelatine, soak the gelatine in a shallow dish with about 3 tablespoons of cold water.

4. Heat the milk over a medium heat and add the vanilla essence. Then add the gelatine to the milk and bring it gently to the boil, stirring continuously. There may be a few little brown blobs of gelatine at first, but if you stir through them and the milk boils, they should all disappear.

5. Remove from the heat and leave to cool.

6. While the milk is cooling, whisk together the egg yolks and 100g icing sugar and salt until smooth.

6. Pour the yolk mixture into the cooling milk while stirring constantly.

7. Put the mix back onto a gentle heat, and stir continuously with a fork or whisk. You’ll know when its done when it becomes thick and custardy- to test, dip a spoon in and if it coats the back of the spoon when removed then it’s done. The custard CANNOT BOIL or it will overcook and make it eggy.

8. Put the custard in a bowl and refrigerate for about 10 mins. No more than 15 as we don’t want the custard to set.

9. While the custard is cooling, whisk the double cream on a low setting until it starts to thicken. Gradually add in the 50g icing sugar and then turn the whisk to high until the cream forms soft peaks.

10. With a large spoon or spatular, gently fold in the fruit puree until it combines evenly with the cream. At this stage you can also add a little red food dye to make the filling pink if you wish.

11. Get the custard from the fridge and give it a little stir to break the skin. Fold the custard into the whipped cream mixture until combined.

12. Pour the mixture into the center of the swiss roll lined bowl.

13. Use the leftover swiss roll slices to top the bowl- like a pie top- cover the whole of the bowl-this layer acts as a base for the cake and keeps all the filling in so should also have no gaps.

14. Put the bowl in the fridge overnight- at least 8 hours.

15.  To unmold, prepare a clean surface or cooling rack. Carefully turn over the bowl onto the surface, and peels gently at the edges of the cling film- the weight of the cake should hopefully make the cake fall neatly out of the bowl. Then peel off the cling film.

16. Time to make the goo for the brain! Put the caster sugar into a small pan, add the cold water and bring to the boil, stirring until the sugar completely dissolves.

17.  Mix the arrowroot with 2 tablespoons cold water in a cup and mix until smooth, then pour into the sugar syrup. Bring to the boil again, stirring, then remove from the heat.

18. Pour the the goo on top of the brain cake, using a spoon to spread it evenly around.

19. Wipe the edges clean, and decorate how you like- I used candy corn, as is the season, but its more traditional to use whipped cream and berries.


Happy Halloween!
Hayley xx

Saturday, 12 October 2013

Ladies- 5 Non-Generic Costume Ideas!

Hi Folks,

Last year, I made a list of 5 non-slutty Halloween costumes- it’s by far been my most popular post, especially recently. You can find it here if you would like to peruse.

So I thought I’d treat (or trick- see what I did there?) y’all to 5 more this year.
What I originally wanted to call this post was "5 non-generic, non-female version-non slutty costumes for Halloween 2013"- but it didn't fit. Here are some character based costumes idea's for Halloween for those who think putting on a pair of cat ears just isn't going to cut it. 

1. Wednesday Adams from The Addams Family 
Wednesday "I hate everything" Addams, if you don't know, is the cute little psychopath from The Addams Family. 6 Years old, her hobbies include painting, and trying to kill her siblings. 
You will need (lots of black):
*A black dress with sleeves
*A man's white shirt collar- to sew onto the dress. 
*Black tights/stockings
*Black flat shoes
*A black pigtail wig- or if you're crafty you can make one out of wool! Tutorial here.  
*Pale makeup
*A fake knife (optional)


2. The Grand High Witch from The Witches (1990)
Super creepy kids movie The Witches was based on the Roald Dahl book of the same name. Angelica Houston plays the fabulous, spooky yet stylish Grand High Witch- this movie still scares the bejesus out of me today- Spoiler Alert- she turns into a giant rat lady. Yep. Its terrifying. 
You will need:
*A black dress with sleeves and a V-neckline
*Black gloves
*Chunky silver rings- for over the gloves
*A black wig with bangs
*Black & Purple fabric- for the cloak- here's a tutorial on how to make a lined cloak.
*Black tights
*Black shoes
*Red Lipstick


3. A Weeping Angel from Doctor Who 
In my opinion, the Weeping Angels from Doctor Who are the scariest monsters they've ever created...Dont Blink. The costume could be a little tricky-but worth it for the nerd points. 
You will need:
*A loose grey dress
*Grey face paint (enough for your face and arms) 
*Grey wig
*Wings- you could do these in 2 ways-
1. Buy some angel wings and spray paint them grey OR
2. Make some wings from cardboard and paint them. 


4. Regan from The Exorcist (1973)
The Exorcist is widely known as one of the scariest movies ever, largely due, I imagine, to the the truly terrifying main character Regan- a little girl possessed by a demon.  
You will need:
*(depending on hair colour) a brown wig. 
*White "granny" night dress- in UK, try BHS or Marks and Spencers.
*Face paint for the scars/pale face.
*Green paint for the demon vomit.

5. Lydia Deetz from Beetlejuice (1988)
Lydia is a moody, goth teen from Tim Burton's cult horror comedy movie Beetlejuice. Creepy, angsty Lydia often carries a camera, wears a lot of black lace- oh, and she also talks to ghosts. 


You can go pretty freestyle with this costume as she wears a variety of clothes but here are some ideas below.
You will need:
*Black hair or wig- your fringe should be parted into 3 thick strands. She also often has a messy ponytail on top of her head (if not wearing a hat)
*Wide brimmed black hat
*A sheet of black lace to use as a veil or shawl
*An SLR camera
*black dress
*black lace, fingerless gloves
*Pale makeup.


...So there you go, 5 creepy characters for some Halloween inspiration if you dont fancy being a Tesco Value witch or black cat this year. Please do get in touch with your costume idea's this year- especially crafty homemade projects! I'd love to hear from you. 
Happy Halloween! 
Ta Ta for now,
Hayley S